

How To Make Clean Cuts With A Circular Saw
How to Use a Circular Saw: Long Cuts
Learn how to safely saw boards freehand, cutting plywood with a straightedge guide and build a ripping jig for accurate cut with a circular saw
Learn how to employ a circular saw to quickly and accurately cut long boards and plywood. Plus, nosotros've included plans for a handy cutting guide attachment for your saw.
You might also similar: TBD
- Fourth dimension
- Complexity
- Cost
- An hour or less
- Beginner
- Less than $20
Saw boards freehand
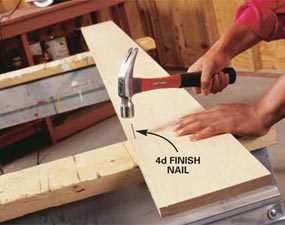
Photo 1: Secure the board
Secure the lath for cutting lengthwise by nailing it to sawhorses. Position one finish boom at each finish near the edge of the lath and abroad from the path of the blade. Pound the nails flush to the surface.
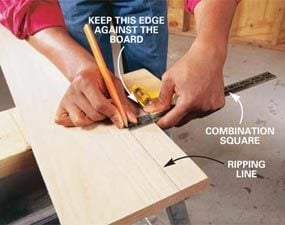
Photo two: Depict a guideline
Draw a guideline parallel to the edge of the board with a combination foursquare and pencil. Press the fence of the combination square snug against the board as you slide information technology forth.
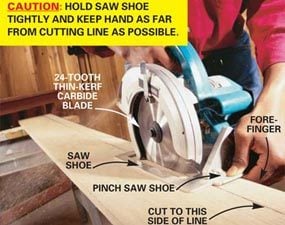
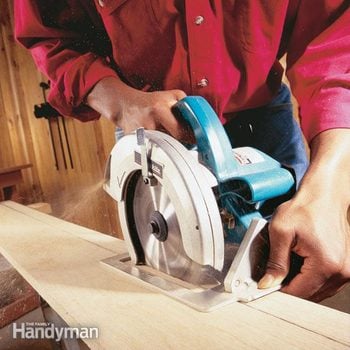
Photo 3: Carefully position your finger
Position your forefinger nether the saw shoe and tight to the border of the lath and pinch the shoe of the saw betwixt your thumb and forefinger. Now make sure the saw blade is 1 in. dorsum from uncut wood and start the saw. Guide the saw along the line, sliding your forefinger along the border of the board as you cutting.
Fifty-fifty if your woodworking is limited to an occasional weekend projection, you'll eventually need to cut a narrow piece from a long board or sheet of plywood. Sawing long boards is like shooting fish in a barrel if yous own a tabular array saw. But you can besides practise information technology accurately with a practiced circular saw. In fact, it's usually easier to cut long pieces of plywood with a circular saw and a straightedge than to wrestle unwieldy sheets through a table saw. A circular saw won't cut equally smoothly equally a table saw, but with a couple of techniques, a little finesse and some practice, you can cut nearly as accurately. Sound farfetched? Not actually—pros practice it all the fourth dimension. Nosotros'll show you how to apply a circular saw to apace and accurately cut long boards and plywood, and give you lot plans for a handy cutting guide attachment for your saw.
Learn how to make perfectly straight cuts using a circular saw in our video tutorial.
Nail downwards the board and use your finger every bit a guide-carefully!
This is a quick style to cut a few 2- to iv-in. strips, but if you take to cut narrow strips often, build the jig shown on p. 32. For this method, you must smash the board directly to the sawhorses with stop nails (Photo ane). Utilize 4d end nails for three/4-in. thick wood and 8d finish nails for 1-ane/2 in. boards. Then mark the board and cutting information technology to width (Photos 2 and 3). This method results in a lath of consistent width and parallel sides whether the board you're cut from is straight or crooked. If you want to create a direct edge on a kleptomaniacal lath, mark the lath with a straightedge or chalk line instead.
Position your hand on the wide section of the saw shoe, not on the narrow side about the blade, and grip the shoe with your forefinger and thumb. Your forefinger acts as a guide. As yous cutting, directly pressure level straight ahead through the handle of the saw, and concentrate on the line. If the saw starts to wander from the line, support to about half-dozen in. behind where you first strayed from the line and start again. Earlier you lot squeeze the switch to restart the cut, make certain the saw blade is perfectly aligned in the kerf and maintain a firm grip in example the bract catches and jerks the saw. Good follow-through is the hush-hush to an accurate finish. Guide the saw beyond the end of the lath as if the line continued.
Circumspection!
Don't utilize this method If the lath is splintery or if your finger will be closer than 3 in. from the saw blade.
Cut plywood with a straightedge guide
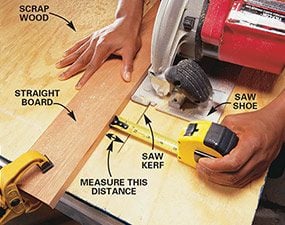
Photo 1: Clamp a straightedge
Clamp a straightedge to a scrap of lumber for a circular saw rip guide. And then agree the shoe of the saw tight to the straightedge while you saw a kerf in the scrap. Mensurate and record the verbal distance between the straightedge and the inside border of the saw kerf.

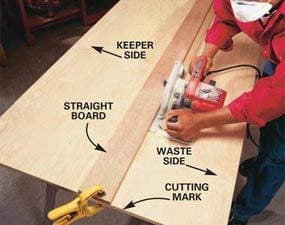
Photo two: Measure and mark
Measure and mark the desired width of the cut board. Then use the measurement obtained in Photo 1 to make a second fix of marks for the straightedge on the "keeper" side of the beginning marks. Align the straightedge with the second set up of marks and clamp it tight.
Photograph 3: Slide the saw's shoe
Slide the saw's shoe against the circular saw rip guide to rip the plywood. To ensure a directly cutting, press the saw firmly against the straightedge every bit you push button it along.
Clamp a straightedge for super-straight cuts
Clamp a perfectly straight board or metal straightedge to a sheet of plywood to brand cabinet-quality straight cuts. The fundamental is to align the straightedge at exactly the correct distance from the cutting line (Photo two) and go along the saw shoe tight to the straightedge as you cut. Photo 1 shows how to make a examination cutting and measure out the distance from the edge of the shoe to the edge of the blade. Measure out advisedly and record the dimension for reference. Then kickoff the straightedge from the cutting line by this distance (Photo 2).
When you lot begin a cut, barely nick the plywood with the blade to make sure the blade simply touches the outside edge of the cutting mark. Movement both ends of the straightedge slightly to adapt the cut if necessary, then reclamp information technology. At the beginning of the cut, press the front of the saw shoe against the straightedge. At the end of the cutting, go on the back of the shoe tight until the cut is complete.
Tip:
Clamp the straightedge on the slice of plywood yous'll be keeping. This mode, if the saw accidentally wanders from the straightedge, it won't ruin the piece you're keeping.
Building a Circular Saw Rip Guide
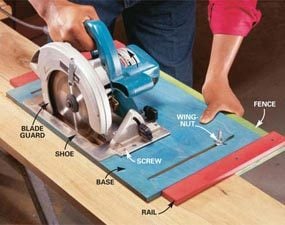
Photo i: Using the jig
Mensurate betwixt the blade and the fence to set up the width of the rip and tighten the Wing-Nuts. Measure at both the front and back edges of the bract to align the contend parallel to the blade. Clamp or tack the board to sawhorses and slide the saw and jig the full length of the board.
A jig for narrow strips
If you don't ain a tabular array saw, you lot can build the guide shown in Fig. A and attach it to your circular saw. It helps you to cut narrow strips (1/ii in. to 6 in. wide) with almost tabular array-saw precision (Photo 1). Y'all may take to modify it to fit your saw's shoe. It takes about an hour to build this circular saw rip guide.
Cut the plywood base and pieces carefully to make certain they take parallel sides and foursquare corners. Make the slots and the pigsty for the blade and blade guard by first drilling 3/8-in. holes in the corners and then cutting between them with a jigsaw. Set the base over the fence and align one long edge. So snug the runway up to the sides of the base and spiral them to the fence with vii/eight-in. screws. The completed argue assembly should fit snugly and slide easily. Connect the fence to the base with carriage bolts and adhere the saw shoe to the base with pocket-sized screws. Drill 5/32-in. holes in your saw shoe and adhere the guide with 5/8-in. screws.
Figure A: Jig for Narrow Strips
This guide allows yous to cut narrow strips with your circular saw.
Safety First
Making long cuts can be dangerous. Earlier you try it, read the following safety precautions.
- Wear safety glasses and hearing protection and avert loose-fitting clothes. Tie long hair back.
- Ready the saw blade to cut well-nigh 1/4 in. deeper than the wood'due south thickness.
- Secure boards less than 6 in. wide with nails and wider boards with clamps.
- Stand beside, never behind, the blade when y'all're cut. Go on bystanders away from the area behind the saw.
- Wedge the saw cutting open with a shim if the board starts to compression the blade and cause information technology to bind.
- Brand sure the bract guard is operating freely. Never block or wedge it in the raised position.
Video: How to Cut Directly With a Circular Saw
Jeff Gorton, an editor for The Family unit Handyman, will show yous how to make perfectly straight cuts using a circular saw. Yous will use this round saw jig over and again.
Required Tools for this Project
Have the necessary tools for this DIY project lined up before you beginning—you'll save fourth dimension and frustration.
Jump Clamps
Required Materials for this Project
Avert last-minute shopping trips past having all your materials ready ahead of time. Hither's a list.

Source: https://www.familyhandyman.com/project/how-to-use-a-circular-saw-long-cuts/
Posted by: hodgessiondee.blogspot.com
0 Response to "How To Make Clean Cuts With A Circular Saw"
Post a Comment